

Ever press a button on your old NES or SNES controller and it just… doesn’t respond? Or maybe the D-pad feels like it’s glued in place, refusing to snap back? You’re not alone. Millions of retro controllers from the 80s and 90s suffer from the same problem: sticky buttons and unresponsive D-pads. It’s not magic. It’s not fate. It’s just rubber wearing out, dust building up, and sweat turning into sticky residue over decades of use. The good news? You can fix it yourself-no soldering, no fancy tools, and for less than the price of a coffee.
Why Your Retro Controller Buttons Stick
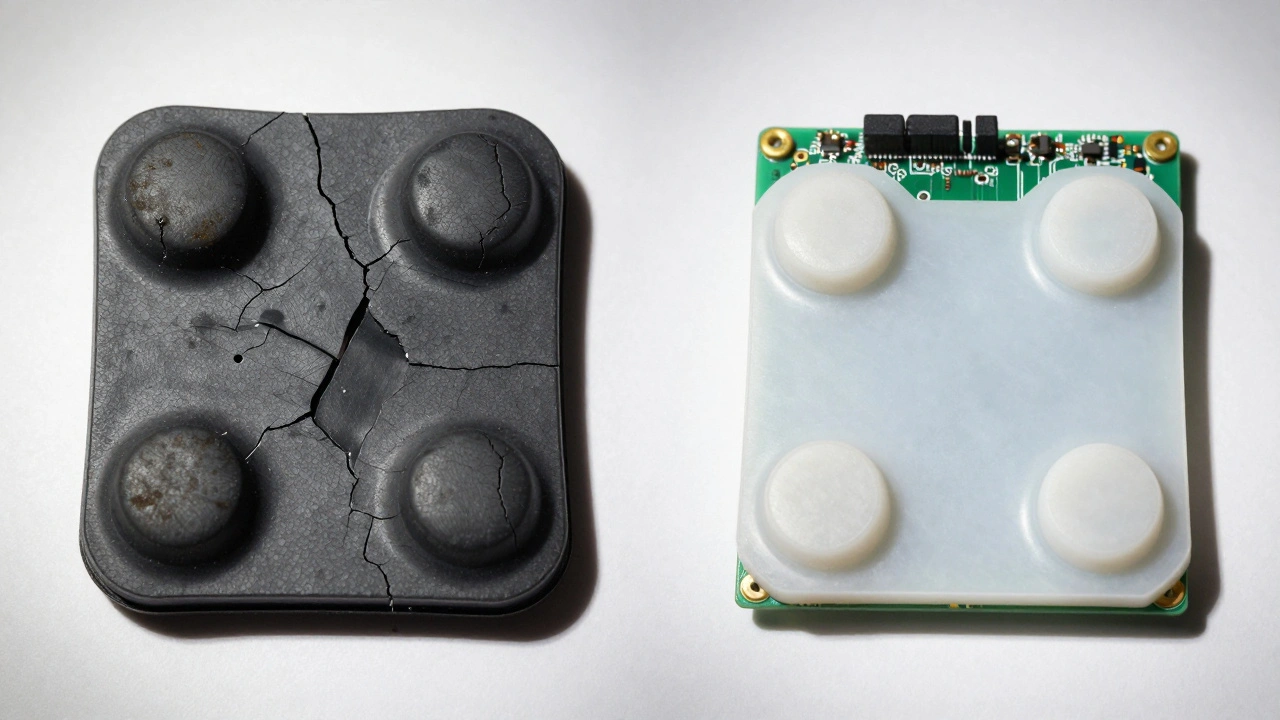
The heart of the problem lies in the rubber button pads inside. These aren’t fancy silicone. They’re simple, soft rubber with a little bump-a contact nub-that presses against a circuit board when you push the button. Over time, that nub gets smooth and shiny from friction. It stops gripping the board properly. Add in years of hand oils, dust, crumbs from snack-time gaming sessions, and even a splash of soda, and you’ve got a perfect recipe for stickiness.It’s not just Nintendo. Xbox 360, GameCube, Sega Genesis-all of them use similar rubber pads. Even controllers from 20 years ago still work fine if they’ve been kept clean. But if you played with chips in hand or left your controller on the couch? That’s your culprit.
What You’ll Need to Fix It
You don’t need a toolkit from Home Depot. Here’s what actually works:
- Small Phillips screwdriver (for NES, SNES, GameCube)
- Flathead screwdriver (for SNES, some Sega controllers)
- Isopropyl alcohol (90% or higher-70% works in a pinch)
- Cotton swabs (Q-tips)
- Microfiber cloth (non-static, like the ones for glasses)
- Optional: Replacement button kit ($10-$15 online)
Forget spray cleaners, WD-40, or hot glue. Those might seem like quick fixes, but they’ll make things worse. Alcohol is your best friend here. It evaporates fast, kills oils, and doesn’t leave residue. And no, electrical tape on the contact nub? That’s a trap. It’ll block the signal unless you press with all your strength.
Step-by-Step: Fixing an NES Controller
NES controllers are the easiest to start with. They’re simple, and if you can handle six screws, you can fix this.
- Unplug the controller. Always. Even if it’s 30 years old, don’t risk a short.
- Turn it over. Remove the six Phillips screws on the back. Keep them in a small container-losing one means you’ll be hunting for a replacement.
- Slide the front half off. The cord is connected to a small connector on the motherboard. Gently pull it free. Don’t yank.
- Now you see the buttons. They’re held in by plastic posts. The rubber pads are underneath. Look for cracks, tears, or shiny spots on the nubs. If they’re smooth and glossy, they’re done.
- Dip a cotton swab in alcohol. Wring it out so it’s damp, not dripping. Rub each contact point on the motherboard where the rubber nubs touch. Do this three times. Let it dry for 10 minutes.
- While it’s drying, press each button 10-15 times. This helps loosen any gunk stuck under the rubber.
- If the rubber is cracked or the nub is worn flat? Replace it. A full NES button kit costs under $12 and includes all four face buttons and the D-pad. Slide the new rubber pads over the plastic posts. They snap into place.
- Reconnect the cord. Slide the front housing back on. Screw it down. Test each button. If it snaps back clean? You’re done.

Fixing a SNES Controller
SNES controllers are similar but have a few quirks. The D-pad is more prone to sticking because it’s used more often. The screws are flathead, not Phillips.
- Remove the four screws on the back. The cord is also connected, but it’s more fragile. Be gentle.
- Once open, you’ll see the D-pad and buttons are part of a single rubber membrane. Clean the contact points under each button with alcohol-soaked swabs. Pay extra attention to the D-pad-it’s got four contact points that all need to be clean.
- Use the swab to gently scrub around the edges of the D-pad. That’s where grime builds up fastest.
- Press each button repeatedly while cleaning. This helps flush out debris.
- Let it dry. Then reassemble. If the D-pad still feels sluggish after cleaning, the rubber membrane might be too far gone. Replacement kits for SNES are cheap and easy to install. Just peel off the old one, line up the new one, and press it into place.
Xbox 360 and Other Modern Retro Controllers
These are trickier. Wireless Xbox 360 controllers use tiny Torx screws with security heads-you can’t just grab any screwdriver. Some people use a small drill bit to carefully remove them. Others cut the wires and replace the whole controller. But if you’re determined:
- Remove the screws. You might need a specialized set ($8 online).
- Once open, you’ll see the rubber domes under each button. Clean the metal contacts with alcohol. The stickiness often comes from sweat buildup around the button shafts.
- Use a swab to clean the shaft itself. That’s the plastic stem that moves up and down. Grime here causes slow return.
- Test before reassembling. Press the button manually-if it snaps back smoothly, you’re good.
GameCube controllers? Same process. Use Mean Green cleaner if alcohol doesn’t cut it. It’s strong, but rinse well. And don’t forget: always let it dry overnight before reassembling.
When Cleaning Isn’t Enough
Some controllers are beyond cleaning. If:
- The rubber is cracked or falling apart
- The button holes in the plastic housing are worn wide, letting the button wobble
- Buttons still stick after multiple cleanings
Then it’s time for replacement parts. You can buy full button kits for almost every retro controller online. They come with new rubber pads, D-pads, and sometimes even new plastic housings. Installation takes 15 minutes. It’s cheaper than buying a used controller on eBay.
One guy on a retro forum fixed his 25-year-old NES Advantage joystick by carefully filing down the button holes with a small rotary tool. It’s not recommended for beginners, but it works if the plastic is worn. Still, replacement parts are safer and cheaper.
How Much Does It Cost?
Let’s compare:
| Option | Cost | Time |
|---|---|---|
| Buy a used NES controller | $35-$50 | Instant |
| Buy replacement button kit + alcohol | $12-$18 | 45 minutes |
| Professional repair service | $25-$40 per controller | 1-2 weeks |
If you’ve got three controllers with sticky buttons? DIY saves you over $75. And you get to keep the original. That matters.
How to Keep It From Happening Again
Once it’s fixed, don’t let it go bad again.
- Keep snacks and drinks away from your controllers.
- Wipe them down monthly with a dry microfiber cloth.
- Store them in a closed case or drawer-not on the floor, not on the couch.
- If you’re not playing for months, unplug them. Moisture builds up even in storage.
Controllers that get regular light use and clean care last 30+ years. The ones left out? They’re dead by 15.
Final Thought: It’s Not Broken-It’s Just Dirty
These controllers were built to last. They’re not fragile. They’re not obsolete. They just got neglected. Fixing them isn’t about nostalgia. It’s about sustainability. You’re not repairing a toy. You’re restoring a piece of history that still works. And the satisfaction of pressing a button that hasn’t responded in 20 years… and hearing it click back? That’s worth every minute.
Can I use water to clean my retro controller?
No. Water can cause corrosion on the circuit board and leave mineral deposits that attract more dirt. Always use isopropyl alcohol (90% or higher). It evaporates completely and doesn’t damage electronics.
What if my button still sticks after cleaning?
If cleaning doesn’t help, the rubber pad is likely worn out. The contact nub has become too smooth to grip the circuit board. Replace the rubber pad with a new one. Replacement kits are inexpensive and easy to install. Avoid using glue or tape-those are temporary fixes that damage the controller long-term.
Do I need special tools for Xbox 360 controllers?
Yes. Xbox 360 controllers use security Torx screws that require a special screwdriver set. You can buy one for under $10 online. If you don’t have one, you can carefully use a small drill bit to remove them, but that’s risky. It’s easier to just replace the whole controller if you’re not comfortable.
Are replacement button kits universal?
No. Each controller model uses different rubber pad shapes and button layouts. A NES kit won’t fit a SNES. Always buy a kit made for your specific controller. Search for your controller model + "button replacement kit" online. Reputable sellers list compatibility clearly.
How long does a repair last?
A proper cleaning with alcohol can last 3-5 years if you avoid food and keep the controller clean. A replacement rubber pad can last 10-15 years or more, depending on how often you play. With good care, your controller can outlast newer ones.